Instagram

Tuesday, 30 August 2016

How to Get AdSense Account Approved for Blogspot with Little Trick


We all know that AdSense contextual ads are best-paying Ad program for Bloggers. Though, I have already shared my tutorial on: Create Adsense account but question remains the same: How to get Adsense account approval for BlogSpot bloggers, getting an AdSense approval is not that easy. Google AdSense have some strict account approval policies, and one of them is blog should be six months old. Though, it’s not always true, and if you have created a quality Website, you can get an approved AdSense account easily.
The major problem is for BlogSpot bloggers, for some reasons Google AdSense, doesn’t entertain BlogSpot bloggers. One of the most common reason BlogSpot bloggers get is Issue with page type.  One easy way to get AdSense account with a BlogSpot blog is grabbed a custom domain, create a professional Email address and apply for AdSense account. This works, in 70% of cases. But, in case if you don’t have money to spend on a domain, here is a free trick which will get you an AdSense account approval with co.cc domain.
There is a simple trick which you can use to get your AdSense account approved for Blogspot domain quickly.
If your BlogSpot account have sufficient number of post (minimum 20+) then it’s easy to get your AdSense account approved. If you have personal domain and host chances of AdSense approval are very high.
Now the question is:

How to get Adsense account approval for BlogSpot blog:

  • Buy a custom domain name.
  • Use Google apps to create a domain specific email address.
  • Add pages like About, Contact
  • Ensure you use a clean BlogSpot design.
  • Have atleast 10-15 well-written blog posts.
  • Ensure you don’t use copyright images. If you have copied images from Google search, go back & delete it from your blog.
  • Ensure your sidebar looks clean & professional.
  • Apply for AdSense & enjoy!
Even I got my AdSense account approved after almost 8 re-submission.

Wednesday, 29 June 2016

How To Promote Amazon Products On Your Blog


Amazon has been really kind to us bloggers.
The fact that an online powerhouse (such as Amazon) allows you, me and everybody else to take a cut of their $35 billion pie through the Amazon Associates program, is incredible!
I wanted to write this post to specifically talk about how to promote Amazon products on your blog or website.
Having the interest, desire or whatever you want to call it to make money through your blog is admirable but, you need to know the proper steps and the “right way” of doing things so you can have a chance to make it.
Monetizing a blog is not easy, I admit. Even though Amazon is probably one of the easiest affiliate programs to join, getting readers on your blog, writing the product reviews (which we’ll be talking about below) and convincing the would-be buyer to buy; needs some skills.
It’s not impossible, don’t get me wrong, but you’re much more bound to succeed bigger and quicker if you know what you are doing.

In this post, I am going to show you:
  • How to find the products you want to promote
  • How to pick the right products
  • How to find your unique affiliate links and more importantly;
  • How to promote (and sell) the products on your blog.
Let’s work our way down the list:

How To Find Products On Amazon

I’m not sure about it but my guess would be that Amazon has millions of products to promote and get this; you can promote every single one of them.
Yes, that is right; as an Amazon Associate, you are free to sell and promote all the products that they have on their website (including their own services such as Amazon Prime and even from independent sellers).
Now, even though there are possibly millions of products on there, it’s best to promote products that are related to your niche (i.e your blog topic).
It would not make sense to sell a $10,000 Hublot watch if your site is about 3D printers right?
That is why you should stick with products related to your niche. That’s also why “knowing” your niche is a must when picking one; you need to know what goes with it!
A good place to start is to use Amazon’s own Department pages, which you can see here:
 Even though they have a lot of product categories, it’s a good place to start to narrow it down as much as possible.

How To Pick The Right Products To Promote

Now, this is also an important step if you want a fighting chance to make some decent money on Amazon.
One thing that puts people off using Amazon as a way to earn money online is the fact that it has very low commission rates.
While that is true (your starting point is 4% and the maximum is 8%), it hasn’t stopped many online marketers and bloggers to make a killing with Amazon.
Just look at how this guy is banking $10,000 a month with his Amazon niche website.
Now, the 4% start rate is not much I know, but that is why you have to make sure you do not promote products that are ridiculously cheap.
It’s good to have a mix of “expensive” and “inexpensive” products on your site, fair enough, but do not go for super low prices.
Making 4% off a $5 item is not so great, making 4% on a $100 item is a bit more attractive.
This was a lesson hard learned for me so I don’t want you to repeat this.
Whatever niche you pick, unless you’re into the “bespoke / luxury” type niche, then make sure you do not only include “cheap” items.
It still might work and you still might earn money, but you would need a whole lot of readers and customers to make a decent income and if you’re a beginner here, that is going to take some time.
Here’s Amazon’s commission structure before we continue so you get an idea of how the commission rates are depending on how much you sell:

How To Find Your Unique Affiliate Links

Once you join the network, which I am not going to discuss here but you can take a look at this guide on how to join, your will be given your own unique affiliate ID which will be automatically embedded into every link.
Please note: Your link doesn’t come from the browser, that’s not your affiliate ID!
Do not copy/ paste a link directly from the browser as that does not include your affiliate ID and you won’t make anything if a customer goes through from your site.
Instead, you need to find the link Amazon will generate for you and here is where you can find that:
Once you join the program, you will see this bar on every page you visit on Amazon (as long as you are logged in).
How To Properly Promote Any Amazon Product On Your Blog
Now we’ve reached the part that I know you’ve been waiting for so let’s get into it and get you started on becoming a successful Amazon Associate.
Following are some tips that me, my blogging friends and frankly, every other successful Amazon affiliate are doing to promote the products they want to sell.
The following list is in no particular order and you can use one of them or you can use them all.
If there is anything I’ve learned from constantly frying my brain to understand how to make money online is that there is no correct, one-size-fits-all solution to doing things.
You have to find what works for you, then continue doing that.
One thing is clear, though; these are all proven to work so take your time to read and understand the following piece of this blog post and go ahead and start taking action.
I will also be offering you a chance to download my ebook, which talks about how to properly do affiliate marketing, along with a complimentary ‘Getting Started” course that I know will help you reach your “ah-ha” moment.
Let’s get into it.
Do Detailed Reviews Of The Products You Want To Promote
As I’ve said; you do not have to do everything on this list, but doing product reviews is something I would urge you to think twice before passing on, and here’s why:
Product reviews:
Get you ranked quick,
Get you the right customer and
Make you money!
Let me explain those 3 theories as to help convince you that you need to do product reviews:
Product Review Get You Ranked In Search Engines
Let’s say your niche is about “yoga” or “meditation”. Which blog post title / keyword do you think will rank better, faster and higher?
“How To Do Yoga In The Morning” or
“AVIVA 5mm Yoga Mat Review” ?
One title (the first one) is a bit generic and while it would still be a good idea to publish it, it might not lead to sales.
On the other hand, a detailed product review will get you ranked quickly as it’s a super specific keyword and there is very minimal competition for that rank term; thus you get ranked faster (and higher).
Product Review Get You The Right Reader & Customer
If I type in the keyword for “morning yoga”, chances are I am not interested in buying anything, but if I look for a specific brand of yoga mats, chances are I’m looking to buy.
Sure you could assume that I just want to see how it looks, but typically; that interest is usually triggered by a need to buy it.
I am sure there aren’t many people looking up specific yoga mats just to look at them. And even if they were; your skills as a blogger and affiliate marketer should help convince them that this product is best for them with your review.
Product Reviews Make You Money
Yes, that reader that is looking for a specific brand, product or service and is looking for their reviews, is a few decisions away from buying.
Which means product reviews are a gold mine if you know how to do them correctly.
Most the earnings I make from this blog are from product reviews so I can tell you reviews do work (and not just for Amazon products).
I would suggest you at least try doing one or two and see how that goes. If you find the right product (which you can see how here), write a review for it and then wait a bit; you’re bound to see some sales sooner or later.
And remember, there is no limit to how many product reviews you can do; you can make a site simply dedicated to doing product reviews  it a step further then and do a roundup post of what you think are the best / worst products that you’ve found.
The possibilities are endless here.
Do you need to buy them all?
Of course not. Although I do recommend that, I know that buying up products to review is not cheap, especially if you haven’t started making any money yet.
Here’s a quick guide on how you can review products without buying them.
Bonus tip: Once you get some solid readership numbers, you’ll also be surprised at how many product creators get in touch with you to send you their products for free just so you can review them. Which is amazing and it really shows you that you’ve finally become an “authoritative figure” in your chosen blog topic.
Ok, enough about product reviews. But wait; there’s one last thing I need to mention about this:
Link To Your Reviews In Posts
Whenever you mention a product you have reviewed, rather than linking directly to the product, it’s best if you could link to your review.
This will minimize your affiliate links (which search engines do not like) and also give the potential customer “a taste” of the product you are promoting.
You can also link to the products when you mention something relatable to it. For example, continuing with that “yoga mat example”, if I were to type in a blog post;
“…..and I use my favorite yoga mat, which is this….”
I might link that piece of text to my review of the product (whichever it is).
Have A Niche-Specific Amazon Affiliate Website
Now, this method is good to consider but I would recommend that if you are a beginner; start on a “normal” blog and promote your products on there.
The thing I like about these types of services is that they give you that “store look” which is a great way to entice buyers to buy.
They come complete with a “Shopping Cart”, “Check Out” button and the sorts.
If you’re interested in having your own store set up but do not want to go through hassle or spend money, then check out the next option:
Get Your Own Free Store From Amazon
Yes, Amazon does offer a service that you can use to build a store which you can then promote on your existing blog or buy a domain for it.
I have to warn you, though; while they do the job, they are not as “pretty on the eye” as much as you’d like.
If you want to take a look at how to build one (which is called an aStore by the way), I’ll leave it in the capable hands of Amazon itself to show you how to create your Amazon aStore.
Use Plugins To Insert Amazon Widgets
A popular method you will see on many blogs is to insert a widget (with the help of a plugin) in your sidebar which will display your chosen products constantly rotating in your sidebar.
One thing to remember though is that sidebars are dying off.
Most of my readers across all of my “web properties” come from mobile (last time I checked mobile was 70% of my traffic).
This means your sidebar content will be buried under all your post and won’t be seen unless the reader scrolls way down to the bottom.
This is something you should consider as “an extra way” to promote Amazon products on your blog if you are planning on building this up to be a profitable venture.
Embed Your Products In Your Most Popular Blog Post (Or All Of Them)
My last and final tip would be to embed a grid of products under (or on top but that would look ugly) of your most popular blog post; inside the content.
This would make sure that you are getting to as much readers as possible and it will also minimize your affiliate links (unless you go crazy with it).
I recommend you only feature a maximum of 8 products so as not to clutter your content which would lead to a very bad user experience.
This might sell a few products and yes it works for me, even though I sometimes see it as a bit of a “hard sell”!
Also, remember that relevancy is key to everything so if you have a post about your favorite “yoga mats” and you embed your favorite yoga mats in the content, that would make sense.
I am currently also using this method and yes, I do make sales with it which is great. Just remember to keep it relevant and not to over do it.
A Quick Recap Of What We’ve Just Discussed:
Find good products to promote that are related to your niche.
Make sure you include a bit of ‘expensive stuff” to up your commissions.
Always make sure you get your proper affiliate ID (do not copy/paste from browser).
Do product reviews as the can help you rank better and sell more.
Do not overdo it with affiliate links and plugins.
Keep it relevant and
I forgot to mention; Enjoy the process!
Making money online is not an easy task but it doesn’t have to be something you hate doing.
Find what works for you, keep experimenting and do not be afraid to fail. Try, explore and have fun building a real business.
It takes “effort” to do that and you should be proud to have thought about trying to make money online.
Speaking of which;
Subscribe to my email newsletter in the sidebar so that you get updated about new posts every time a new post is published on Bloggeria.
Thank you very much for reading this post and I hope I’ve shown you how to promote Amazon products on your blog successfully without too many headaches.
If you have any questions, success stories or simply want to share your experiences with the Amazon Associates platform, you can do so below in the comments section.
I’d love to hear from you.
Thanks again for reading, till next time.

Want to earn money easily? then

Wednesday, 22 June 2016

Important Blogging Tips For College Students


Few years back, no one would have imagined that blogging will become a major way for anyone to make money. In last 2 years, we have witnessed an incredible increase in the number of bloggers. Specially school and college students are the majority of adopters. .
There are many college students (most of them from engineering college) who spend day and night to fulfil their blogging dreams. Unfortunately, most students are missing their classes ,and spending their precious time in researching and writing articles. This habit ultimately effects their overall academic performance. Here are few tips for them to maintain a balance between College and blogging:


Blogging for College students:

If there is one thing which I regret about my blogging career, that would be: I didn’t started blogging in college time. College time is the best time to start a blog of your own, as in this period you will be getting maximum leisure time, and instead of spending time on Facebook, or playing counter strike, you can work on your blog.
Additionally, it will help you to enhance your personality, and by the time you are out of the college, your blog will be making handsome income. Imagine, how good that would be if your blog income will help you to pay most of your bills. If you are one of those students, who are in school or college, and have a blog, here are few more tips to help you make most out of your blogging:
1. Attend Your Classes
It is true that blogging gives lots of fame and money, but you should accept the fact that degree is most precious thing for any student. Companies judge you by your academic performance, not from your blogging experience. So never ignore your studies. Attend all the classes and maintain a good percentage.
2. Make A Proper Schedule
Make a time table and decide the time which suits you for blogging. Don’t be a night owl by doing research and blogging. It will affect your schedule. Try to complete your work and go to bed before midnight.  Take at least 6-7 hours of sleep.
3. How much time you should devote
It totally depends on your college timing. If your college ends up at 5:00 p.m then you have 7 hours for blogging and studies. Try to create a balance between these two work. Both are necessary. Stick with your schedule.
4. Tell everyone about your blog
Try to tell everyone about your work. Don’t become a suspicious guy among your friends. Give your blog address to your friends and ask them to read your blog and leave comments.
5. Part  time job
In college many students join call centers and various other part time job. But blogging is a favorite part time work and it pays you more than any other part time job. Try to catch some web publisher and show your writing skills to them. You can easily get work if you are an efficient writer.
6. Attend Meetings in Your City
Try to catch some famous people of your field. Attend blog camps, blogger’s meet and Tweetup organized by various bloggers in your city. Register for these events and catch big fishes of your field and discuss them about blogging. You can also ask for help regarding any subject.
7. Organize Blog classes in your college
If you are an established blogger then you can organize blog camps for other students of your college. You can take permission for the classes from your head of department of director of your college. You can educate your fellow students about blogging business, and how they can earn from a blog.
8. Impress your friends
Blogging is an immediate source of fame for any student. You can become famous among your friends by showing your blogging skill. Try to research for different articles on your niche and write about them on your blog. Try to solve various technical problems of your friends through your blog.
9. Read blogs related to your branch
If you are a student of Computer science then you can read blogs related to your study.Lifehacker and Howtogeek are very well-known blog for computer users. Similarly you can read HowstuffworksTechcrunch and Mashable for knowledge of various startup companies and Social Media.
These are the basic Blogging tips for college students. Are you a college student who loves blogging. Do you follow any one of the above mentioned tips. Kindly leave a comment.

Reasons Why It’s Impossible for You to Monetize your Blog

Many bloggers quit blogging career because they don’t earn any income. Earning through blog is not due to luck, you earn after doing with lot of smart work and dedication towards your goal. There are bloggers who are earning good online income, but other bloggers just read their article and never implement that’s the reason they fail to earn online. You need to find out the reasons why you face failure in making money online.


1. Shortcut to earn money:
Many bloggers want to make money fast, which is not possible. You will need time and smart work to make money online. No affiliate programs, eBooks or advertisers can make you rich in few days. Working for 4-5 months won’t make you a professional blogger. Give your best efforts and time to your blogging career; you will surely earn online income.
2. Lack of efforts
You might get a purchase a blog and start wishing that it will generate money. Just having a blog and posting articles won’t lead you towards your dream. You need to learn everything about making money online and equally put efforts to it. Just reading article and not applying the tricks with proper planning will only result in failure.
3. Fear of hurdles
If you want to make money you have to pass through hurdles, you won’t find red carpet always. You will find lots of problems in beginning. Be confident, search for solutions, ask other bloggers but don’t fear from failure.
4. Distraction
This is very common mistake bloggers make. They will choose lots of options to make money online and keep jumping from one option to other. This will surely lead to failure in making money online. Focus on one project at a time and give your best to it, you will surely get success.
5. Lack of passion
Only passion will drive you towards your goal. It is important to have passion and positive energy to achieve what you want from your blog. If you have passion, you will overcome barriers and achieve your targets.
Hope this post will help you to earn money online. Do share your insight for making money online.

Sunday, 19 June 2016

The Best Google AdSense Alternatives For Your Blog:

When it comes to making money from a blog, AdSense is one of the best blog monetization programs available.

Creating an AdSense account and getting approval is not a particularly easy process, especially for a newbie blogger. The real problem emerges when Google bans your AdSense account!

A good solution is to start looking for some of the best Google AdSense alternatives.


The AdSense alternative ad networks mentioned below are not necessarily better than Google AdSense, but depending on your blog niche and site’s traffic, a few AdSense alternative programs (like Media.net or Viglink) might give you better earnings and results than AdSense.
You should be aware that Google AdSense is a contextual ad networking program while a few of the AdSense alternatives mentioned below are not contextual ad programs. For example, BuySellAds offers a direct advertisement platform, Infolinks is an in-text linkprogram, and Viglink turns your outbound links into affiliate links.
Getting Google AdSense approval is a dream for bloggers. But if you fail to get approval or get rejected for some reason, don’t despair, because this article will make you aware of many Google AdSense alternatives for you to use to earn money online.
(Before choosing an alternative to Google AdSense, however, check out what kind of traffic you are generating on your blog.)

Best Alternative to Adsense: 2016 Edition

Note: I am continually updating this list with all the new monetization methods that I use as an AdSense alternative. So bookmark this page and keep coming back to learn about more new blog monetization programs.
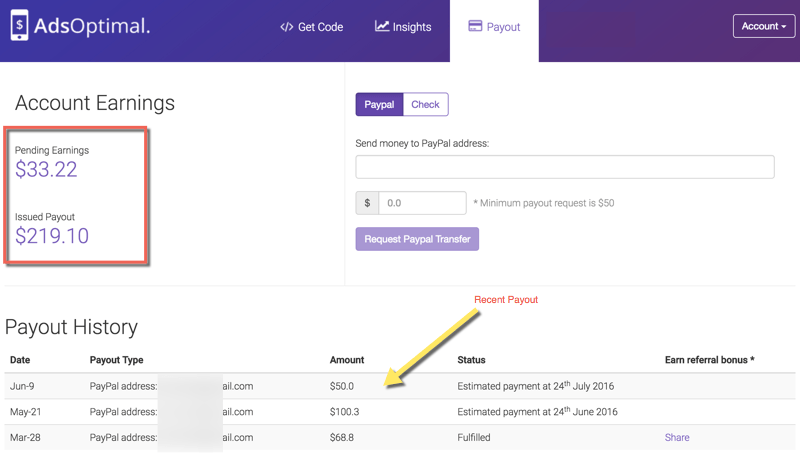
Adsoptimal
Many of you might not have heard of AdsOptimal but you should. This ad network is online since 2013 & quite popular among bloggers for AdSense alternative. One of the most common complaint among bloggers are, other alternatives doesn’t pay as good as AdSense.
With AdsOptimal you don’t need to worry about that as the ads they show is of high quality & if you have a blog with good traffic, you would end up minting great money from your blog. Getting started is easy & if you have a premium blog, you will get additional $5 for integrating the ad on those site.

I added all of my blogs & claimed additional bonus. Easy money!  You should signup & implement AdsOptimal before this extra signup bonus is gone.
Medianet AdSense alternative
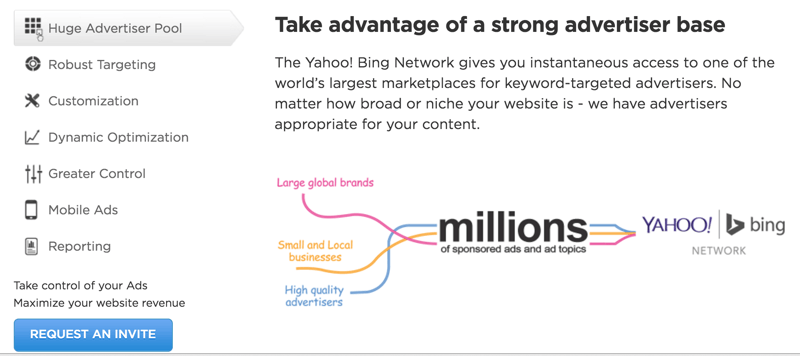
Media.net is the best alternative to AdSense in terms of ad types.
Media.net is a contextual ad network by Yahoo! and Bing, and it offers high-paying ads. Moreover, the ad types involved are similar to AdSense, and if you have a quality blog, you are more likely to get Media.net approval in no time.
Make Money with Amazon Native Shopping Ads
Seeing an Amazon advertisement program listed as an “AdSense alternative” might be little surprising for many, but in 2016 they are one of the most popular choices among bloggers for site monetization.
Until recently, it was only the Amazon Affiliate program, but with Amazon Native Shopping Ads & CPM based ads, they are a great choice for users who are looking for something other than AdSense.
In my opinion, the Amazon display program is ideal for those who have US & EU traffic. Native Ads in particular is a bit like affiliate marketing on steroids.

Infolinks is an in-text link ad network that has been a profitable blog monetization network for many publishers.
Infolinks offers various types of advertisements that you can place on your blog, but the most popular one is an in-text ad unit, followed closely by an in-frame ad unit.
It does not offer contextual ads like Google AdSense, but as an alternative to AdSense, Infolinks is highly recommended.
You can use other ad networks with it to increase your blog’s revenue.
Signing up for Infolinks is easy, and they have a low minimum payment threshold.
Adversal contextual ads
Adversal offers features similar to Superlinks, but you need to have monthly page-views of 50,000 to apply.
Minimum payout is $20, and after 35 days, you get paid at the end of the month.
Payment modes are PayPalwire transfer, and ACH. It takes 3-4 days to get your application approved.
I suggest that you apply for both Superlinks and Adversal. Superlinks ads will pay more, but it is also good to have another alternative option.
Chitika Ad program
Chitika is a CPC product-oriented program.
I like Chitika for two reasons:
  1. It always places relevant ads based on your site’s content (which helps you to get more clicks).
  2. You can edit text color, URL color, and border color so your ads blend in with your blog’s format.
You can also use their referral program to earn extra income.
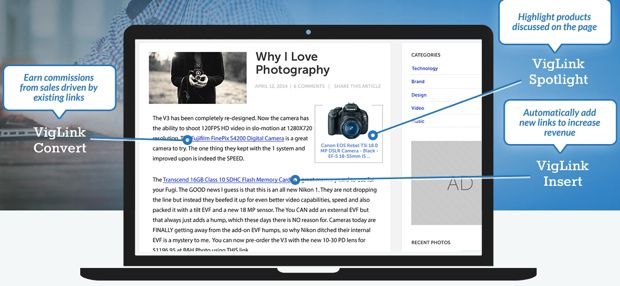
Viglink AdSense alternative
Viglink is perfect for a blog which is linking out to a business or e-commerce site.
The Viglink concept is quite different from all of the alternatives mentioned above because with Viglink you earn money by making affiliate sales.
Viglink works great when you have outgoing links to business or product pages such as a fashion store or Amazon.
Even if you don’t have outbound links but you are using money-related terms like Apple, iPhone, etc., Viglink will automatically add links to these words, and you will end up making pretty decent money.
What’s best about Viglink is that it’s incubated by Google and is a very SEO-friendly ad program.
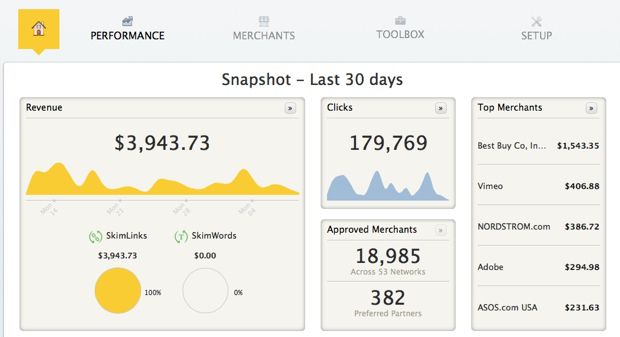
skimlinks ads dashboard
Skimlinks is the best alternative to Viglink and it works in a similar manner.  Skimlinks converts your outbound links into affiliate links, and you earn money whenever a sale occurs.
It is possible that you could end up making ten times your existing earnings with Viglink and Skimlinks, as they pay for affiliate sales and not for clicks.
These are just some of the best and most popular alternatives to AdSense.
If your AdSense account is disabled, the best way to cover the lost AdsSense earnings potential is by using a combination of two or more ad networks. (For example: using Infolinks or Viglink along with contextual ads.)
Which one of the above methods have you used and which ad program worked the best?  Tell us in the comments!

How to Create an AdSense Account (For Newbie Bloggers)


As a blogger, you have surely heard of the AdSense program from Google which is regarded as one of the best contextual advertisement programs available.
In this post, I will demonstrate how you can create an AdSense account for your website.
There are many AdSense alternatives available, but no matter what network you try, you will likely find that Adsense is the best.
If you have some marketing skills, however, you may also want to look into affiliate marketing.  My post on Affiliate vs AdSense will give you my personal insights into both networks.

When I started blogging, “AdSense” was a foreign concept to me. When I initially signed up for AdSense, I needed a lot of help from my friends, and I still was not sure I was doing it right.
For beginners who are not familiar with AdSense, it is an advertisement program for publishers started by Google (See Wiki details), wherein contextual ads are placed on your blog and you get paid when someone clicks on these ads.
You also get paid when you click on the below banner
In this blog post, I present an essential guide for beginners who are not sure how to apply for AdSense.
There are a couple requirements which you must meet before you can apply for AdSense:
  • First, of course, you need to have a website.
  • You also must be above the age of 18, otherwise you will need to apply using the name of a parent or guardian who gives you permission to do so.

Steps to create an AdSense account:

AdSense has recently changed the account approval process to include the following steps:
  • Sign up for AdSense
  • Add AdSense ads to your blog
  • Wait while your account is reviewed and either accepted or rejected
Although the new AdSense account approval process is quite lengthy, the process will ultimately help to maintain the quality of AdSense for all users.
It is also important to make sure your blog or website is abiding by AdSense policies before applying.
Also, be sure to read the terms and conditions mentioned on the signup page to learn more.

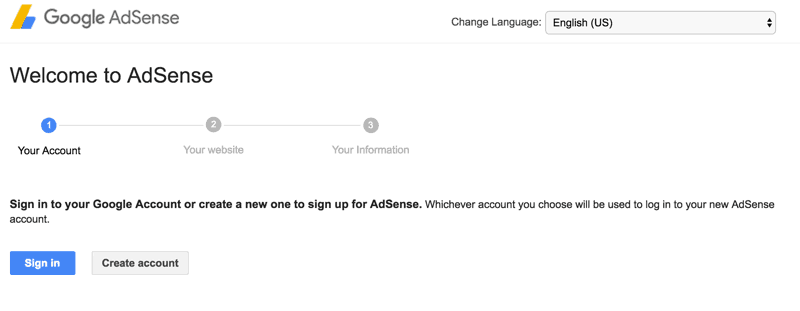
Step-by-Step Guide to Creating an AdSense Account:

First, go to the Signup page for AdSense.
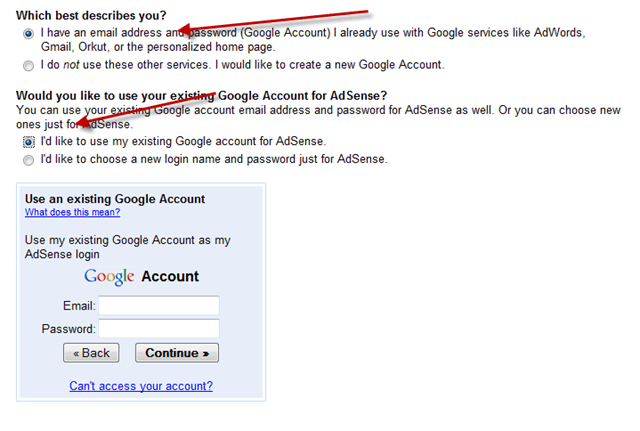
You will see an option to create a new Google account, or you can choose to use your existing Google account.
Create AdSense Gmail account
Note: If you have a custom domain name & you are using Google Apps for your domain email address, I suggest you use that to sign up for your AdSense account. When you use domain specific email addresses (admin@domain.com), the chances of getting your AdSense application approved is increased by a factor of 3.
Otherwise, you can use your existing gmail address.
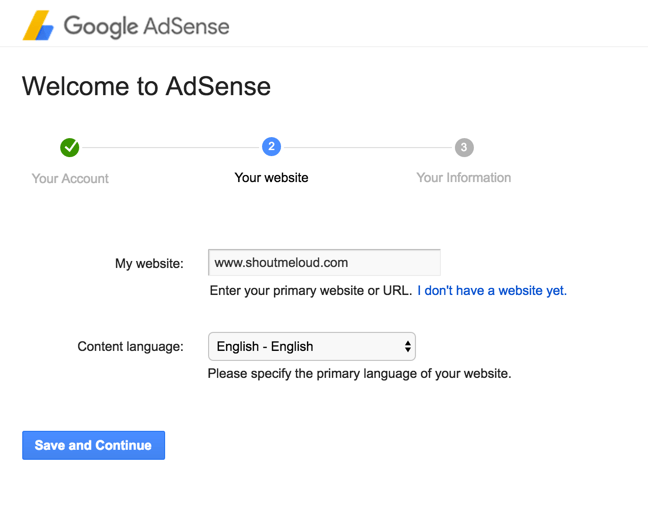
Website Details:
Create AdSense accont for Website
This form is straight-forward. You simply need to enter your website address and select the content language. For the website URL use your blog address, and make sure to add it without “http://”.
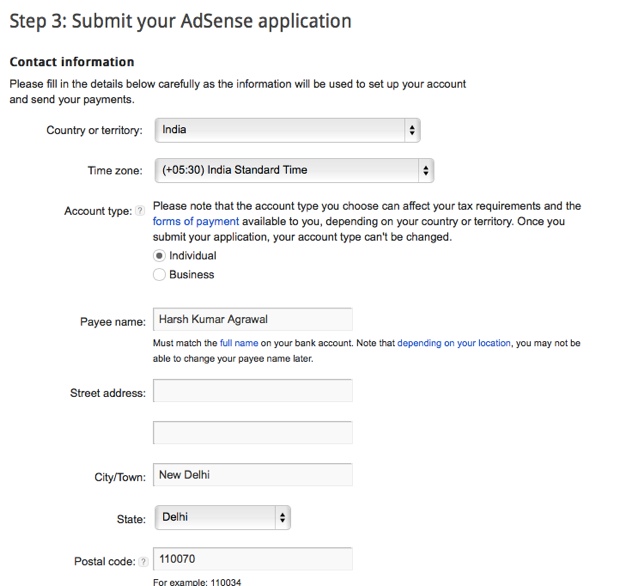
AdSense contact information:
Adsense contact information
This is the most important part.
I remember making a couple of mistakes at this part when I first signed up. Hopefully, if you follow this guide, you won’t make the same mistakes.
The “payee name” is very important. Make sure to use the same name under which you have a bank account, as AdSense will be sending you checks or EFT payment under that name.
If you make a mistake here, changing the payee name of your account will be difficult in many countries, including India.
So ensure your bank account name and payee name are exactly the same.
Next add your contact information and fill in the other details.
Accept AdSense policies:
adsense-policies
Read the AdSense policies and put a checkmark in all three boxes.
Once done, click on “Submit”, and on the next page you can review your details.
Make sure that all the details are accurate and up to date!
Signing up with your email account:
Adsense-Email-address
You can use your current email address to sign up, or you can create a new gmail ID just for AdSense. For fast approval, I would suggest you to use ZohoMail, and create a free domain-specific email address.
In my case, when I tried to sign up using a generic gmail address, I was rejected four times.  However, when I later applied using a domain-specific email address, I got instant AdSense approval.
Submit Adsense Tax Information
Once you have signed up for AdSense, you need to add AdSense codes to your blog. The AdSense team will review your application again after you add the codes, and your account will be activated with an Adsense Pinthat will be sent to you.
All of this takes approximately  1-2 months depending upon your geographical location.
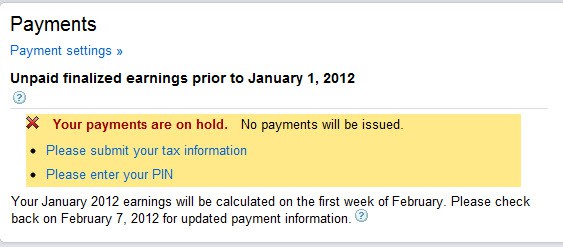
Once everything is set up, in order to get paid from AdSense you need to complete two further steps:
  • Submit your tax information
  • Enter your pin
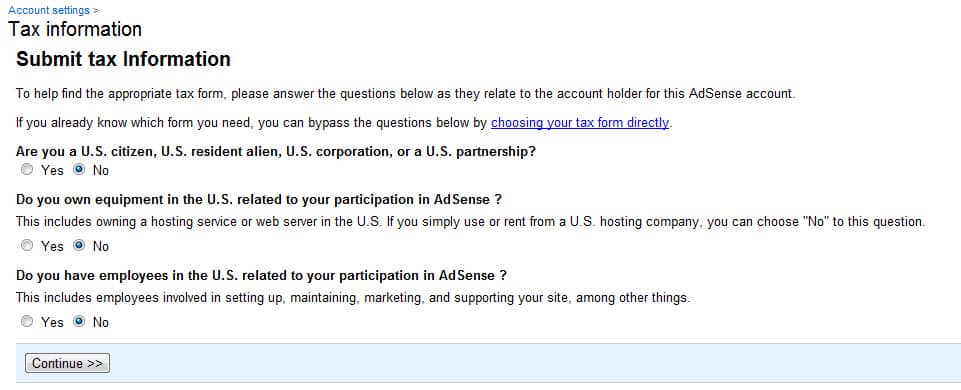
You will need to submit a tax form specific to how you are conducting business. For certification of No U.S. activities, and for Indian AdSense publishers, you can fill in this tax information:
Indian Publisher Tax Info Adsense

AdSense Pin:

You will receive an AdSense Pin by mail once you reach the threshold of $10. You need to add the pin to your AdSense account.
You will start receiving payment once your AdSense account reaches the $100 threshold.
I hope with this guide you can successfully create an AdSense account.
If you do not yet have a blog, you can refer to my previous tutorial on How to Install & Setup a WordPress Blog,
Have any questions regarding the AdSense account creation process? Feel free to ask me via the comments section!